
The features everyone was waiting for in GitHub Actions are finally here: Environments and Manual Approvals.
This is gonna be fun.
Intro
Today we talk about Environments and Manual approvals in GitHub Actions. These long-awaited features have been announced at GitHub Universe 2020 couple of weeks ago and finally released just a few days ago, on the 15th of December to be precise.
In this video we are going to see how to enable them and how to use them to control our deployment flow. We can finally say that Actions have proper Continuous Deployment capabilities.
If you want to have an overview of everything you can do with GitHub Actions, I highly encourage you to watch the video I made on the subject after you are done with this post, you can find it here
Video
As usual, if you are a visual learner, or simply prefer to watch and listen instead of reading, here you have the video with the whole explanation and demo, which to be fair is much more complete than this post.
(Link to the video: https://youtu.be/w_37LDOy4sI)
If you rather prefer reading, well... let's just continue :)
Why Environments?
So first off, why do we talk about Environments and Manual Approval together.
Well, Manual approvals are actually built on top of Environments.
And they are just one of the features Environments offer to prevent unauthorized deployments, preserve secrets, track changes and much more.
For these reasons we will talk about all we can do with the Environments. But first, let's see how to enable this feature.
Enabling Environments and Availability
To do so, just go to the repository Settings, and then you have this new Environments section.
Click on it, and here you can create a new Environment.
Give it a name, click on Configure environment, and here you have it.
Check this section of the video for a demo about enabling environments in your repo.
To configure an environment in a user repository you must be the repository owner. To configure an environment in a repo that belongs to an organization, instead, you must have admin access.
Also note that you will be able to create and use Environments only on public repos or if you are part of a GitHub Enterprise Cloud organization. Environments and all their features, including manual approvals, are not currently supported in "normal" private repos and in the Pro and Teams plans. If you go to settings on those repos and plans, in fact, the Environment menu tab simply won't show up.
Environment Settings
Right, let's go and see what we have in the Environment configuration.
First section is the Environment Protection Rules
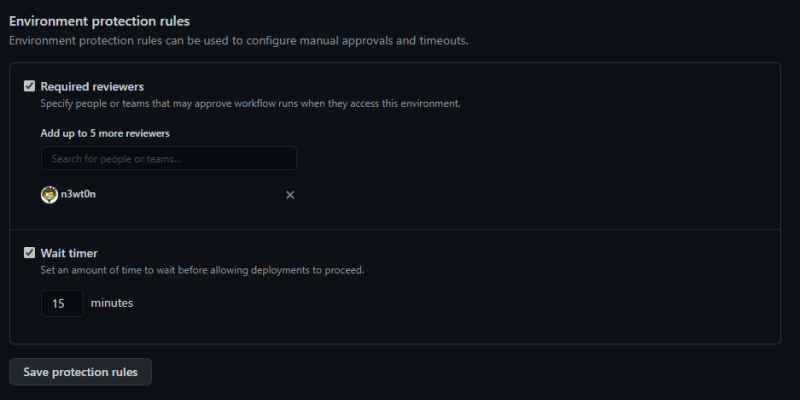
The Environment protection rules can currently be used to configure manual approvals and timeouts, and perhaps more settings will come in the future.
The manual approvals, as the name says, allow you to specify up to 6 people or teams that will be notified for a deployment and will need to approve it for it to continue.
To be in te "Approvers" list you only need Read Access to the repository, and that allows you to have people who can approve deployments that don't necessarily have the ability to alter code.
There is currently no way to specify a minimum number of reviewers, meaning that if just one person approve it, that deployment will continue.
The second setting, instead, is the Wait Timer. This is useful if you want your deployment to be delayed of a certain number of minutes after the jobs is triggered. And this works with and without approvals.
We then have the Secrets section.

Secrets are encrypted environment variables. They are accessible only by GitHub Actions in the context of this environment.
GitHub already has the Secrets management at repo level, but anybody with write access to a repo can alter those secrets. They cannot see them (because as you probably know after saving them they can be retrieved only by the Actions in the workflows), but they can change them and use them in any workflow.
For this reason, we now have Environment level secrets. The job that does the deployment doesn't get access to these secrets until after the approval, if any, and this protect these secrets from unauthorized access.
If you want to know more about secrets, and also how secrets with the same name between Environments and Repo level work, check this section of the video.
Use Environments in an Action Workflow
Let's see how we can actually use all of that in an Actions Workflow. It is pretty easy.
  DeployDev:
    name: Deploy to Dev
    runs-on: ubuntu-latest
    environment:
      name: YOUR_ENVIRONMENT_NAME
      url: URL_OF_THE_DEPLOYMENT
    steps:
      - name: Deploy
        run: echo I am deploying!
This is all you need to do! Just add the environment section to your job and reference the environment by name.
The url parameter is optional and can be either a string literal or a value coming from an output parameter of a step in the job (this is useful for example if your deployed app changes URL every time and you know it only after deploying it).
Everything that has been configured on that environment, including approvals, timers and secrets will be automatically applied to that job.
If an approval is required, all the users/teams in the Approvers list will receive a notification on Screen, by Email, and on the GitHub Notifications. Soon those will also be integrated into the Mobile App and Slack.
An Example
Check this section of the video for the demo about this example
Let's say you want to:
- Deploy to Dev only when you are in a Pull Request
- Deploy to Staging only when you commit or merge into main
- Deploy to Production only after Staging, with an Approval
To do this, you would need first to create three environments, add the approvers to the Production one, then setup your Action Workflow like this:
name: CI + CD

on:
  push:
    branches: [ main ]
  pull_request:
    branches: [ main ]
  workflow_dispatch:

jobs:
  Build:
    runs-on: ubuntu-latest
    steps:
      - uses: actions/checkout@v2

      - name: Compile
        run: echo Hello, world!

  DeployDev:
    name: Deploy to Dev
    if: github.event_name == 'pull_request'
    needs: [Build]
    runs-on: ubuntu-latest
    environment:
      name: Development
      url: 'http://dev.myapp.com'
    steps:
      - name: Deploy
        run: echo I am deploying!

  DeployStaging:
    name: Deploy to Staging
    if: github.event.ref == 'refs/heads/main'
    needs: [Build]
    runs-on: ubuntu-latest
    environment:
      name: Staging
      url: 'http://test.myapp.com'
    steps:
      - name: Deploy
        run: echo I am deploying!

  DeployProd:
    name: Deploy to Production
    needs: [DeployStaging]
    runs-on: ubuntu-latest
    environment:
      name: Production
      url: 'http://www.myapp.com'
    steps:
      - name: Deploy
        run: echo I am deploying!
As you can see, everything revolves around the environment definition.
Check this section of the video for a more in-depth demo and explanation about this example.
Is in cases like this one that the new Visual Graph of GitHub Actions shines
Visualization
This new feature gives you a much better way to visualize how your workflow is progressing.
In the previous example, when you are coming from a Pull Request the workflow takes the Deploy to Dev branch:

As you can see, this is very clear from the new visualization, as well as it is clear that the Staging + Production branch has been skipped.
If instead we are committing into main, the other branch of the workflow is activated:

As you can see, it deploys to Staging and then it waits for approval on Production.
And when an approver clicks on the Review Deployment button, they have a chance to either Reject or Approve the deployment, and to leave a comment.
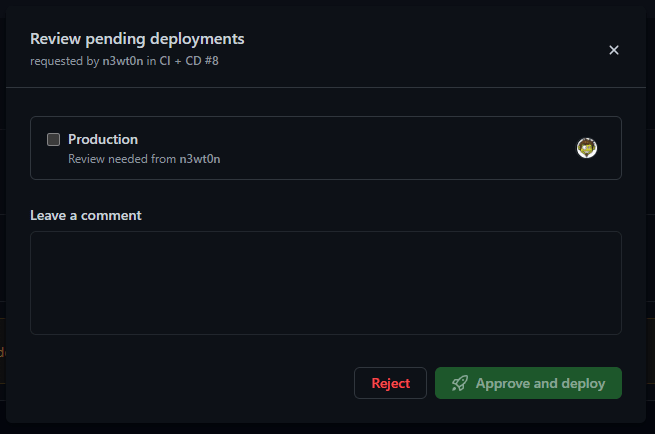
Super easy to setup and manage.
And as you can see, it also shows the deployment url on the environment box for easy access to your application. This comes from the url param previously defined in the environment section for that deployment.
Watch the visualization demo and explanation here
Tracking and Auditing
Everything that happens in an environment is audited. In fact, Environments track the history of your deployments. And so you have the ability to see exactly what has been deployed to a specific environment (and that will soon include also work items, issues, and so on), who did it and when.
In fact, you if you to the Code page on your repo, the main page, and scroll down you will find the environments list on the right column:

If you click on a single environment you will see the Activity Log for that specific environment, while if you click on the section title you will have comprehensive status of all the environments.
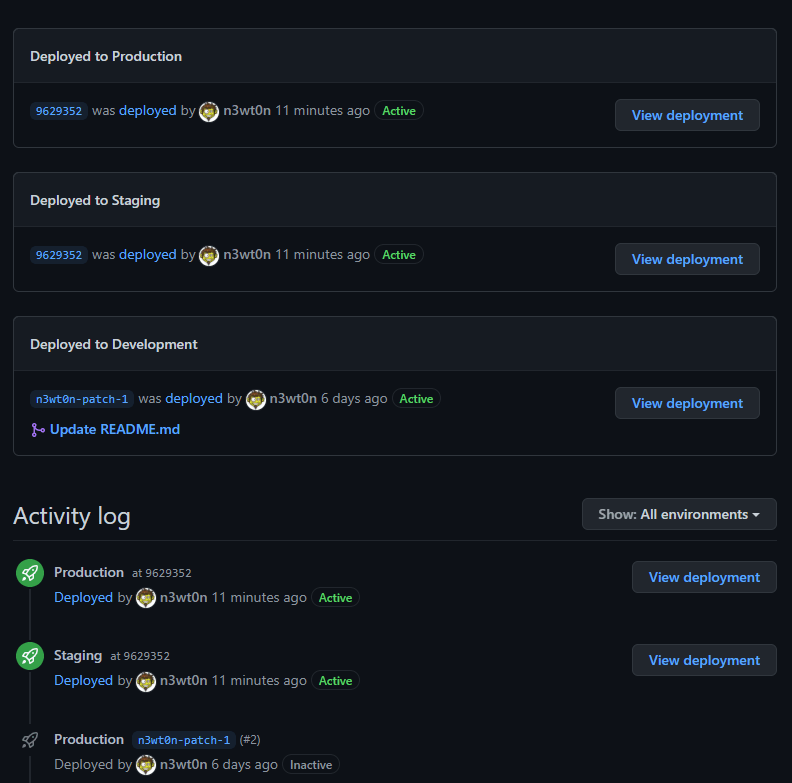
Here you can see two main things.
On the top part you have the status of each environment which includes the last deployment, together with the branch and commit deployed. The view deployment button will take you to the url that has been previously defined in the environment section for that deployment. This is super useful because you can see immediately what you have deployed in that moment in each and every environment.
On the bottom, instead, you have the activity log for all environments, including approved and rejected deployments, and of course that can be filtered by environment as well.
Once again, I'd recommend you to take a look at the demo of this here for a more comprehensive explanation.
Conclusion
Alright, that's it for today.
Let me know in the comment section below what you think about these new features, if you'd like to have something different, and if you plan to use them in your projects.
I'd appreciate if you would take a look at the video about this (you can find it on YouTube at this link: https://youtu.be/w_37LDOy4sI), leave a like and perhaps subscribe to my channel. It is about DevOps, especially with GitHub and Azure DevOps.
Like, share and follow me 🚀 for more content:
📽 YouTube
☕ Buy me a coffee
💖 Patreon
🌐 CoderDave.io Website
👕 Merch
👦🏻 Facebook page
🐱💻 GitHub
👲🏻 Twitter
👴🏻 LinkedIn
🔉 Podcast


