Lately I've been helping quite a few people on the their job hunts and I noticed a trend. It can be really difficult to keep track of your job search when you're applying to tons of places and each company wants you to do take home assignments, interviews, and more. I've also been helping those newer to development ramp up with React and AWS Amplify so that they can quickly get some experience building fully functioning apps and hopefully give them a little knowledge and confidence boost at the same time.
That's why I built Journey. It's a small enough app that it can be figured out relatively easily and it also serves a purpose that hopefully many will find useful.
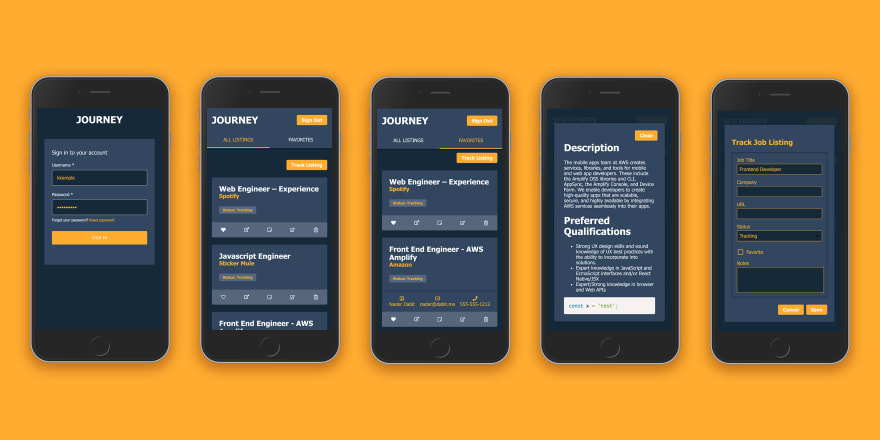
What It Does
Journey allows you to track job listings that you are interested in and provides features like:
- 📝 Keep notes in Markdown
- ❤️ Add favorites
- 👮 Authenticated
- 🔥 Serverless back end
- 🚀 GraphQL
- 💻 Deploy back end in minutes
How It Works
The code for the app is located here.
In the project, you'll notice a folder named amplify. This folder contains the back end for the app that can be redeployed in anyone's account. In the amplify folder you'll see a backend folder. In this folder you'll see the configuration for the two main features:
- Authentication service (powered by Amazon Cognito)
- GraphQL API (built with AWS AppSync)
In the backend/api folder you'll see the GraphQL API configuration as well as the base GraphQL Schema.
This is the base GraphQL Schema. You'll see that the base schema looks like this:
type Listing @model @auth(rules: [{ allow: owner }]) {
  id: ID!
  title: String!
  company: String!
  url: String!
  status: Status!
  favorite: Boolean!
  notes: String
  relatedDate: String
  contactName: String
  contactEmail: String
  contactPhoneNumber: String
  createdAt: String
  updatedAt: String
}

enum Status {
  APPLIED
  TRACKING
  INTERVIEWING
  TAKE_HOME_ASSIGNMENT
}
If you've never worked with Amplify before you may not be aware of the @model directive. These are part of the GraphQL Transform library of the Amplify CLI.
@model - Decorate any base type with this directive to get CRUD and list query and mutation definitions, a DynamoDB table, and resolvers created for the GraphQL operations.
Deploying the App
The app can be configured to be used by only one person, or allow anyone to sign up and use the app. Make sure to pay attention to the instructions as some things are slightly different for a shared app.
A shared instance is a great option if you are part of a bootcamp or want to enable others to use this app in their job search.
Deploy the back end and run the app
Clone the repo & install the dependencies
~ git clone https://github.com/kkemple/journey.git
~ cd journey
~ npm install
Initialize and deploy the Amplify project
~ amplify init
? Enter a name for the environment: dev (or whatever you would like to call this env)
? Choose your default editor: <YOUR_EDITOR_OF_CHOICE>
? Do you want to use an AWS profile? Y
~ amplify push
? Are you sure you want to continue? Y
? Do you want to generate code for your newly created GraphQL API? N
> We already have the GraphQL code generated for this project, so generating it here is not necessary.
Add a user for you to log in with (if you plan to host for multiple users and allow registration, skip this step)
~ amplify auth console

> user pool
Under the "Users and Groups" tab, click "Create user". Uncheck the "send an invitation to this new user?" checkbox and enter the necessary attributes, then click "Create user".
Start the app and login
~ yarn start
Once the app starts enter the username and password you used in the previous step. You will be prompted to change your password.
Deploy the front end
Create a new repository with your git service of choice
Push the project to your new repository
~ git remote add origin <your_new_repository>
~ git push --set-upstream master
Connect to AWS Amplify Console and wait for build to start. You will be given a production URL and you are ready to track your job listings!
If you wish to allow users to sign up and use this app then pick the
sharedbranch to connect in Amplify Console, otherwise usemaster.
Customizing the GraphQL schema
This schema can be edited. If you need additional fields, you can update the backend by doing the following:
Update the schema (located at amplify/backend/api/jobassist/schema.graphql).
Redeploy the back end
amplify push
If you or anyone you know needs help getting up and running with this app, reach out to me on Twitter, I'd be happy to help!