Applications can generally be categorized into having two types of performance bottlenecks:
I/O-bound: These applications spend the majority of their time dealing with inputs and outputs.
CPU-bound: These applications spend the majority of their time engaged in computational tasks.
Now, how do these classifications translate into the context of front-end applications, particularly React apps?
I/O Performance Challenges in React
When it comes to React applications, issues often arise in terms of I/O performance, primarily related to asynchronous HTTP calls. Ineffectively managing these network requests can lead to a slowdown in the application. While this post primarily focuses on CPU performance, it's essential to briefly touch upon key areas where solutions can be found for I/O-bound problems:
Implement lazy loading whenever possible.
Exercise caution during the initial loading of assets and backend requests.
Reduce the frequency of loading highly static elements (e.g., select options, configurations).
Debounce the number of times specific requests are made.
Parallelize requests as much as possible using techniques like Promise.all.
Enhance the efficiency of critical backend endpoints by optimizing database accesses, among other measures.
CPU Performance Challenges in React
The main thrust of this post centers around addressing CPU performance challenges in React. Before delving into the specifics, let's establish a concrete definition of performance:
Browser applications predominantly operate as single-threaded programs.
Scripting tasks, such as JavaScript execution, DOM rendering, and event handling, all occur within the same thread.
A slow JavaScript module can potentially block the main thread.
If the main thread is blocked, the user interface becomes unresponsive, resulting in a drop in frames per second (fps).
Responsive UIs aim for a minimum of 30 fps, ideally achieving 60 fps, meaning each frame should compute within 30 ms or less.
In the context of React, this issue becomes critical. When a React component update is triggered, the entire subtree must be rendered in less than 30 ms. This becomes particularly challenging with complex and lengthy component structures, such as tables, trees, and lists, where large-scale re-renders may be necessary.
React Render and Commit Phase
React, at a high level, operates in two distinct phases:
Render Phase:
Initiated when a component updates, triggered by changes in props or hooks.
React traverses the component subtree, rendering each child and computing the Virtual DOM (VDOM) subtree.
Only the "dirty" subtree, affected by updates, needs to be recomputed; the parents of updated components may not require re-rendering.
The efficiency of this phase is proportional to the size and computational cost of each child component.
React.memo can be employed to provide hints for a more efficient rendering process.
Commit Phase:
The render phase produces a new Virtual DOM of the entire UI.
In the commit phase, React compares the new tree with the previous one (VDOM diffing).
React calculates the minimum DOM mutations required to reflect the new VDOM tree.
DOM mutations are applied, updating the UI.
This phase is inherently efficient by default.
The entire process must be completed in less than 30 or 16 ms (for 30 fps and 60 fps, respectively) for the UI to be deemed responsive. The workload is directly proportional to the size of the app.
The subsequent exploration will focus on enhancing the efficiency of the Render phase. Before delving into optimization techniques, it is crucial to understand how to measure and identify the sluggish components in the application.
Measuring
Among the tools I frequently rely on are:
Chrome Dev Tool’s Performance Tab
React Dev Tool’s Performance Tab
Chrome Dev Tool’s Performance Tab
This tool stands out as a comprehensive resource applicable to any browser application. It provides insights into frames per second, captures stack traces, identifies slow or hot sections of your code, and more. The primary user interface is represented by the flame chart.
For an in-depth understanding of Chrome’s Performance Tab as applied to React, refer to this documentation.
React Dev Tool’s Performance Tab
To leverage this tool, you'll need to install the React Dev Tool extension in your browser. It tailors information from the Chrome Dev Tool’s Performance Tab specifically to React. Through a flame chart, you can observe different commit phases and the JavaScript code executed during the respective render phase.
This tool aids in easily determining:
When a component undergoes re-rendering.
What props have changed.
What hooks have changed, encompassing state, context, and more. For further details, refer to the introductory post.
Measuring Methodology
Here’s the methodology I prefer when assessing front-end applications:
Optionally, generate ideas about the potential location of the problem.
Measure:
Verify the problem by measuring essential metrics such as frames per second (fps).
Measure (Part II):
Identify problematic sections of code; optionally, validate your hypothesis.
Create a Solution:
Implement a solution based on the insights gathered.
Measure the Solution:
Validate that the implemented solution resolves or alleviates the problem by examining key metrics.
Optimizing without proper measurement renders efforts practically ineffective. While some problems may be apparent, the majority necessitate thorough measurement, forming the cornerstone of the performance enhancement process.
Moreover, measurements empower you to communicate achievements upwards, informing users, stakeholders, and your leadership about performance improvements achieved within specific areas of your application, expressed as a percentage gain.
General Solutions to CPU-Bound Problems in React Applications
Now armed with measurements and an understanding of problematic areas, let’s delve into potential solutions. Optimizing React performance revolves around improving both what components render and which components render.
Many performance issues also stem from anti-patterns. Eliminating these anti-patterns, such as avoiding inline functional definitions in the render method, contributes to more efficient rendering times. Addressing poor patterns can, in fact, reduce complexity and improve performance simultaneously.
🤔 Improving What Components Render
Identifying sluggish components in our React app typically points to specific components that struggle with rendering or have an excessive number of instances on a single page. Various reasons may contribute to their sluggishness:
Blocking calculations within components.
Rendering large component trees.
Utilizing expensive or inefficient libraries.
Most of these issues boil down to enhancing the speed of component rendering. At times, crucial components cannot rely on overly complex libraries, necessitating a return to basic principles and the implementation of simpler alternatives.
For instance, I encountered such challenges while using Formik excessively within multiple cells of every row in a complex table. While improving the efficiency of individual components goes a long way, attention must eventually shift to which components are rendering.
🧙 Improving Which Components Render
This aspect offers two broad categories for improvement:
Virtualization:
Only render components that are visible in the viewport. For example, rendering only the table rows or list items that the user can see. This approach proves beneficial for complex UIs, and while it can be applied without addressing the "what" step, it is recommended. Modern libraries often provide robust support for virtualizing tables and lists, with examples like react-virtualized. Virtualization reduces the number of components React needs to render in a given frame.
Props Optimization:
React aims to make components resemble pure functions but may attempt to render more times than necessary.
React.memo:
Most components in React can be memoized, ensuring that with the same props, the component returns the same tree (although hooks, state, and context are still respected). Leveraging React.memo informs React to skip re-rendering these memoized components if their props remain unchanged.
Addressing the issue of fake prop changes involves instances where the content of a prop remains unchanged, but the reference changes. A classic example is an event handler.
Similar challenges arise when constructing complex data structures without proper memoization before passing them as props. Utilizing useMemo ensures that rows are recalculated only when dependencies change, enhancing efficiency.
While you have the flexibility to customize how React.memo compares current vs. previous props, it's crucial to maintain a swift calculation since it's an integral part of the Render phase. Avoid overly complex deep comparisons during each render.
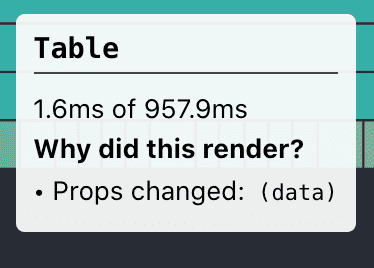
How does it look now?
Props changed
How it looks in the React dev tool:
Did they really? Are they fake prop changes? Use useCallback and useMemo.
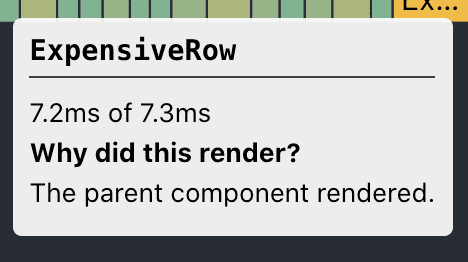
Parent rendered
How it looks in the React dev tool:
Use React.memo to memoize your pure components.
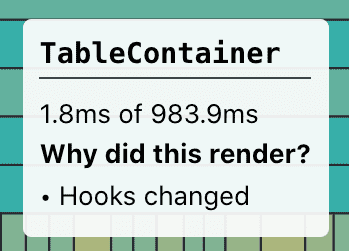
Hooks changed (state, context)
How it looks in the React dev tool:
Nothing too obvious to do here. Try to validate that the hook that changed makes sense. Perhaps a bad context provider is faking out changes the same way as fake prop changes might appear.
Similar to this, I personally run a developer-led community on Slack. Where we discuss these kinds of implementations, integrations, some truth bombs, weird chats, virtual meets, and everything that will help a developer remain sane ;) Afterall, too much knowledge can be dangerous too.
I'm inviting you to join our free community, take part in discussions, and share your freaking experience & expertise. You can fill out this form, and a Slack invite will ring your email in a few days. We have amazing folks from some of the great companies (Atlassian, Scaler, Cisco, IBM and more), and you wouldn't wanna miss interacting with them. Invite Form
You may want to check out a seamless way of integrating your notification infrastructure.